In our earlier post we learned about Connecting Java to Microsoft Access.In today’s post we shall learn about connecting Java to Mysql database.For connecting Java to Mysql we need to install Mysql odbc drivers.You can get the drivers from their original website.After downloading the drivers install them on your system.
So you have done the primary step in connecting Java to Mysql.Now open control panel,goto administrative tools.Their select DataSources(odbc).Now you get a dialog box which looks like this and select the add option init.

After selecting the add option there search for”MYSQL ODBC 5.2 ANSI Driver” and select it.It opens a dialog box to enter the details of the sql database…..
In the Data source Name enter the name of the source file.For TCP/IP give it as localHost and keep the port as default.Now enter the user and password details of the Mysql database.After the details of user and password click on test.If connection is ok,then in the field Database we can see the list of the tables present in the given database and select the desired one. With this we have created a connection between java and Mysql.
Now we shall write the program which is similar to that of using Java with Microsoft Access Database.
import java.sql.*;
public class sqldemo
{
  public static void main(String arg[]) throws Exception
    {
           String url="jdbc:mysql://localhost/emp1"; //protocol:subprotocol:sourcefile
           String id="root";     //User name of the Mysql
           String pd="abcd";    //Password of the Mysql database
           ResultSet res;
           try
	{
	 	Class.forName("com.mysql.jdbc.Driver");
 		Connection con;
		con = DriverManager.getConnection(url,id,pd);
 		Statement st = con.createStatement();
		res = st.executeQuery("select * from emp");
		while(res.next())
			{
				System.out.println(res.getString(1)+"  "+res.getString(2));
			}
	}
           catch(Exception e)
	{
		System.out.print(e);
	}
   }
}
Description:In the above program we have used the method forName() which is present in the class “Class” for dynamically load the class.Next we have declared a string url for telling the protocol,sub-protocol and data source which we are going to use.
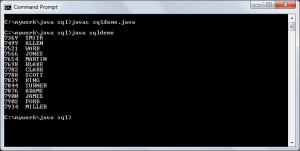
Now we need to make connection which is done by using the method getConnection() which is present in the class DriverManager and it returns the object of the Connection class.In order to execute the statements,first we need to create a Statement.For this we are going to use the method createStatement() by using the object of Connection class and it returns an object of Statement class.For executing a query we shall use the method executeQuery() which is invoked through the object of the statement class.It returns result set of the query which is stored in an object of ResultSet class.So the output of the above program is
OUTPUT:
To download the program click here:download
